Showing posts with label Cookie of the month. Show all posts
Friday, February 13, 2015
A week in phone photos
Last Sunday morning I ran the Hypothermic Half Marathon. I felt really lucky to have my family and one of my closest friends come out to cheer me across the finish line. Do you notice the comical thing about this photo? When I put it up to post it made me chuckle.
Pretty sweet medal (the snowflake turns), but that's about the only good thing about this race. Race review post to come.
The race had a morning and an afternoon run. My brother ran in the afternoon and my kiddos wanted to wait around to cheer him on. I had so much fun (as did they). I need more opportunities to be the one cheering. The little two kept themselves entertained making snow angels :)
Valentines! My son had two parties this week, my eldest one. We had a total of 61 cards to make - phew! I also volunteered to make cookies for the preschool class. Had the dough going and realized I was out of eggs. Went to our neighbours house who only had one and I needed to. Thanks to Google I added the egg and half a banana. Turned out great with very little banana taste.
Thank you Pinterest! Last minute Teachers Valentines!
I took on a new project yesterday. I'm pretty excited about it and hope it works out as well as Pinterest would have me believe - ha ha!
Beautiful sunny day today and the kids had a close up view of a Gorilla at the local zoo.
How was your week?
Monday, September 8, 2014
Playground Snacks
It's back to school again, and with it comes the struggle for my eldest of getting enough time to eat. She's a grazer, and (rightly so) she also wants time to play. Recess is only 15 minutes to do both, so over the past couple of years, we have tried to come up with quick snacks that can fill her up, but are also portable. Here is one of our favorites.
I'm not a big fan of pre-packaged granola bars, especially the no nut ones as they seem loaded with sugar. I will say that this one is also quite sweet, but I prefer it as it is made from scratch. I minimize some of the sweetness by cutting the chocolate chips in half, and I add in raisins or craisins.
The whole batch makes a cookie sheet full that I immediately toss in the freezer. When they are all frozen I transfer them to sandwich bags, and back into the freezer they go. While I'm making lunch in the morning I'll put a couple into her lunchkit for snacktime, and by the time snack rolls around they are good to eat (I have eaten them frozen though and they are just as tasty).
NO BAKE GRANOLA BITES
YIELD: MAKES ABOUT 30 BITES
INGREDIENTS
- 2 cups quick oats
- 1 cup crispy rice cereal (like Rice Krispies)
- 1 cup creamy peanut butter
- 1 cup ground flaxseed
- 1 cup mini chocolate chips
- 2/3 cup honey or agave nectar
- 2 teaspoons pure vanilla extract
- 2 tablespoons coconut oil
DIRECTIONS
- Combine all the ingredients together in a large bowl, mixing gently so the crispy rice cereal doesn't get crushed. Mix until well-combined.
- Using a cookie scoop (or roll small amounts in your hands), drop rounded tablespoonful-sized portions onto a parchment or wax paper lined cooking sheeet. I used my cookie scoop and then rolled the scooped portion out between my palms.
- Refrigerate for 1-2 hours. At this point you can serve them or combine the chilled granola bites in a large tupperware-type container or ziploc bags to freeze or refrigerate. They will stay fresh in the refrigerator for up to a week or for a few months in the freezer.
I'm not a big fan of pre-packaged granola bars, especially the no nut ones as they seem loaded with sugar. I will say that this one is also quite sweet, but I prefer it as it is made from scratch. I minimize some of the sweetness by cutting the chocolate chips in half, and I add in raisins or craisins.
The whole batch makes a cookie sheet full that I immediately toss in the freezer. When they are all frozen I transfer them to sandwich bags, and back into the freezer they go. While I'm making lunch in the morning I'll put a couple into her lunchkit for snacktime, and by the time snack rolls around they are good to eat (I have eaten them frozen though and they are just as tasty).
Wednesday, March 19, 2014
Cookie of the Month - Leprechaun Rainbow Cookies!
Despite loving celebrating the random, Monday rolled around and I hadn't put out leprechaun coins or planned anything festive. My eldest started asking right away if there were any leprechaun clues, so as they ate breakfast I had to steal away upstairs and put out some tricks. She kept me hopping, because after seeing the footprints and green water I had put in the bathroom sink (he went for a swim), she wanted to know where the trail of coins were. Ack! Downstairs I ran as they looked upstairs, found a rainbow drawing from my son, and put some coins out on the floor (thank you Girl Guides for having given my daughter coins a few days before). St Patty's Day rescued!
When the littlest went down for a nap, I figured the middle and I should do our monthly cookie baking - but what to do? Googling leprechaun cookies turned up a whole bunch of shamrocks using cookie cutters, so I turned to rainbows, and found these. I was daunted by the amount of work, but I was also doing an incredible amount of laundry, so these seemed like something I could do in between loads and folding. (Note: these are not for those unsure about food coloring. I figure you could do some of them naturally, but not all?).
Leftover dough can be stored in the freezer for a few weeks.
Not wanting to waste any dough, we turned the scraps into cookies as well. These were a great quick eat for the littles who didn't want to wait for the 3 hours it took to have the rainbow slices ready!
Some tricks I learned along the way:
It was easiest to roll the layers out on parchment paper, then flip it upside down onto the previous layer, and peel off the parchment. A little bit of flour helped with the rolling as well.
The kids LOVED these. They were worth the work. The toddler quickly exclaimed "more ookie!" after she gobbled down the first one. The big two both took them to school on the 18th to share with their friends, and the eldest asked me to make more the following day - ha!
These will probably make it back onto our list for a birthday, or for St. Patty's again next year.
Enjoy!
When the littlest went down for a nap, I figured the middle and I should do our monthly cookie baking - but what to do? Googling leprechaun cookies turned up a whole bunch of shamrocks using cookie cutters, so I turned to rainbows, and found these. I was daunted by the amount of work, but I was also doing an incredible amount of laundry, so these seemed like something I could do in between loads and folding. (Note: these are not for those unsure about food coloring. I figure you could do some of them naturally, but not all?).
Ingredients:
1 1/2 cup unsalted butter
2 cups sugar
2 whole eggs
2 whole eggs yolks
4 teaspoons vanilla extract
2 teaspoons almond extract
4 cups all-purpose flour
1 teaspoon salt
1 teaspoon baking powder
2 cups sugar
2 whole eggs
2 whole eggs yolks
4 teaspoons vanilla extract
2 teaspoons almond extract
4 cups all-purpose flour
1 teaspoon salt
1 teaspoon baking powder
Directions:
In the bowl of a stand mixer, combine the butter and sugar and beat well, for about 2 minutes. Add the whole eggs and 2 yolks, continuing to mix until combined. Stir in the vanilla extract and vanilla.
In a medium bowl, combine the flour, salt, and baking powder and whisk until sifted. Add the flour mixture to the butter mixture about 1 cup at a time, stirring with the paddle attachment (not the whisk) to incorporate each cup. Do not over mix.
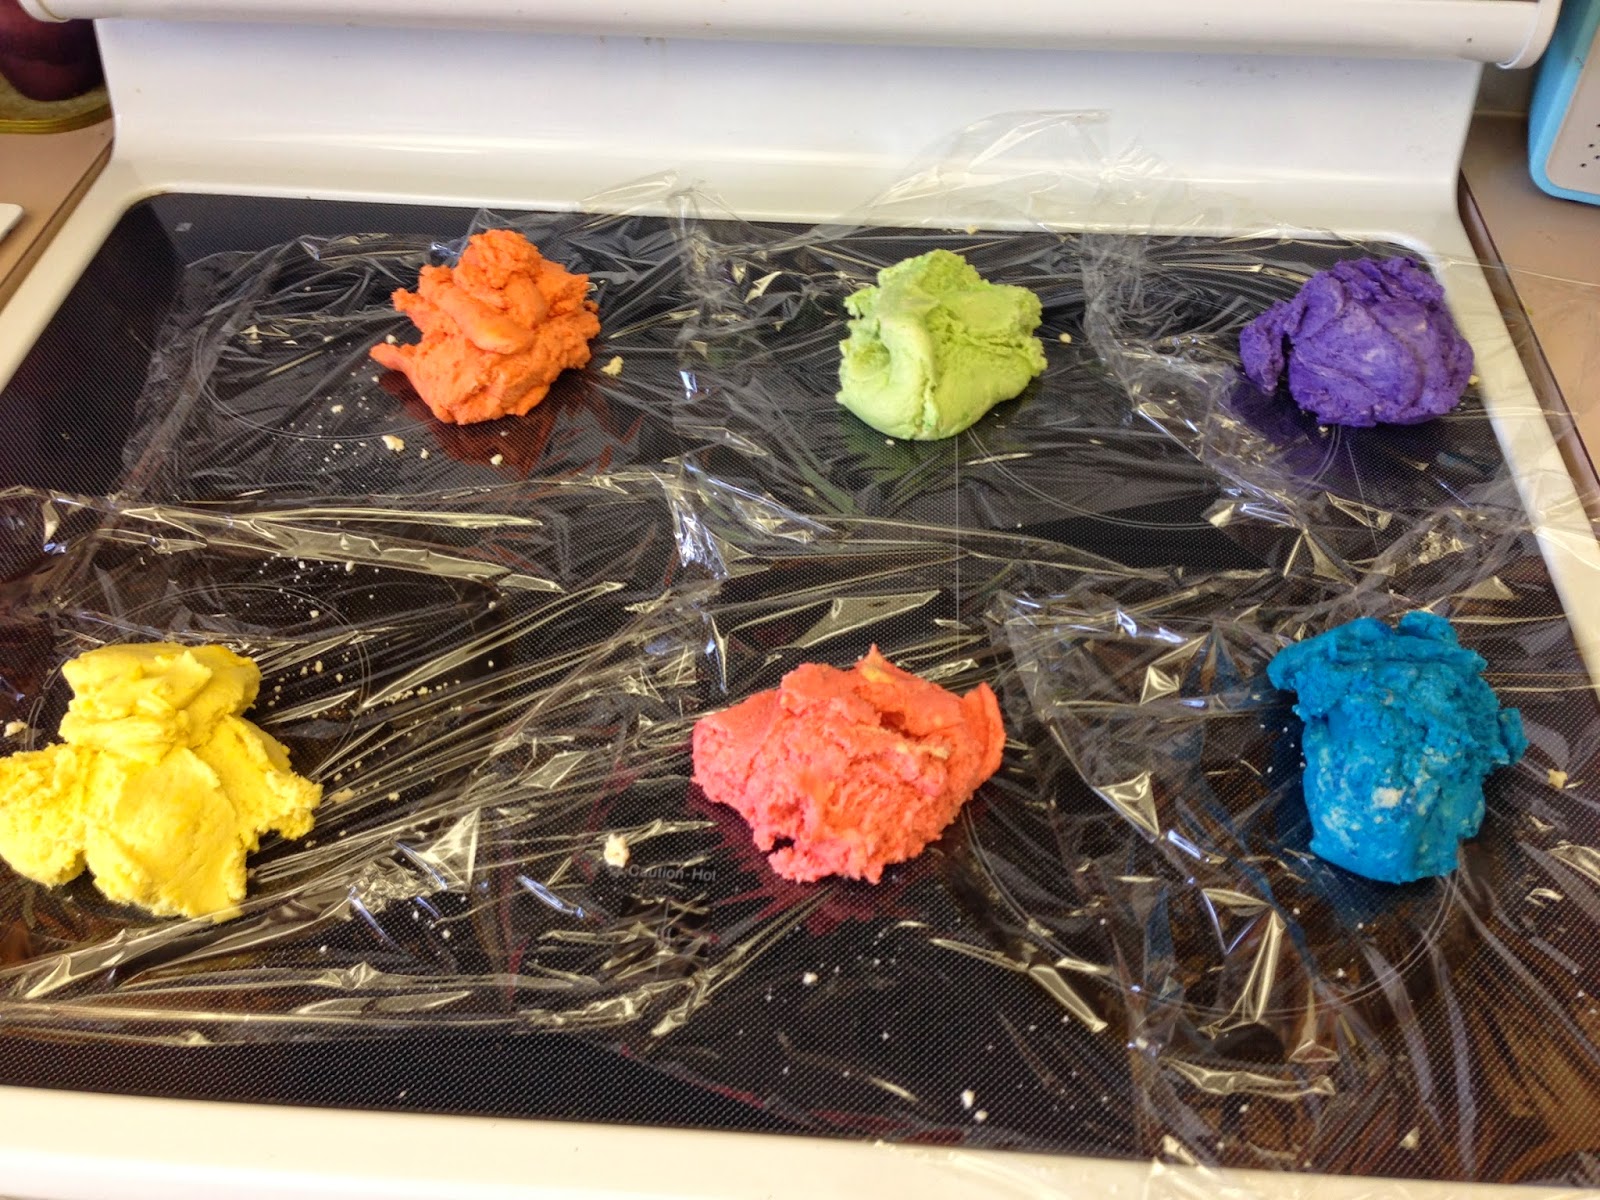
Divide the dough into six equal portions - it helps if you have a kitchen scale for this. Using gel food coloring (gel works so much better for vibrant colors than standard food coloring), color each layer a color of the rainbow. I used a hand mixer to combine the color in with each dough section and then rinsed the bowl and beaters before moving on to another color.
Place dough in individual ziplock bags or saran wrap and refrigerate until firm, about an hour or two. One at a time, roll colors into approximately 6x9 inch rectangles. Refrigerate each layer after rolling, and then add subsequent layers on top in rainbow color order.
When all layers have been stacked, trim edges for a neat rectangle. Wrap again in saran wrap and freeze until very firm. Slice strips across the 6 inch side about 1/4 inch thick and cut each strip in half. Place cookies on a parchment lined cookie sheet and freeze again (this helps minimize spreading).
When you are ready to bake, heat oven to 350 degrees. Bake cookies on a parchment paper lined baking sheet for 6-10 minutes. Cool on the cookie sheet for a few minutes before transferring to a wire rack. Cool the cookie sheet in between baking each batch.
Not wanting to waste any dough, we turned the scraps into cookies as well. These were a great quick eat for the littles who didn't want to wait for the 3 hours it took to have the rainbow slices ready!
Some tricks I learned along the way:
It was easiest to roll the layers out on parchment paper, then flip it upside down onto the previous layer, and peel off the parchment. A little bit of flour helped with the rolling as well.
The kids LOVED these. They were worth the work. The toddler quickly exclaimed "more ookie!" after she gobbled down the first one. The big two both took them to school on the 18th to share with their friends, and the eldest asked me to make more the following day - ha!
These will probably make it back onto our list for a birthday, or for St. Patty's again next year.
Enjoy!
Tuesday, February 4, 2014
Cookie of the Month - Mint Chocolate Delights
I'm cheating a little. My middle and I made this a couple weeks ago. But part of the 'Cookie of the Month' for me, is making new cookie creations, rather than the standard go to Chocolate Chip. These were so delicious, I want to share them with you :)
We had been without cookies for a little while, so I asked my son to go to the cupboard and pick out some chocolate chips of his choosing. He had a selection of skor, white chocolate, or mint chocolate. To my surprise (and delight!) he picked mint chocolate. The recipe on the back of the bag was for squares, so I hit the interweb so find a good cookie recipe. This one, was delicious.
Ingredients
- 2 cups all-purpose flour
- 2/3 cup NESTLÉ® TOLL HOUSE® Baking Cocoa
- 1 teaspoon baking soda
- 1/2 teaspoon salt
- 1 cup (2 sticks) butter or margarine, softened
- 2/3 cup granulated sugar
- 2/3 cup packed brown sugar
- 1 teaspoon vanilla extract
- 2 large eggs 1 2/3 cups (10-oz. pkg.) NESTLÉ® TOLL HOUSE® Dark Chocolate & Mint Morsels
Directions
PREHEAT oven to 325° F.
COMBINE flour, cocoa, baking soda and salt in small bowl. Beat butter, granulated sugar, brown sugar and vanilla extract in large mixer bowl until creamy. Add eggs, one at a time, beating well after each addition. Gradually beat in flour mixture. Stir in morsels. Drop by well-rounded tablespoon onto ungreased baking sheets.
BAKE for 11 to 13 minutes or until cookies are puffed and centers are set. Cool on baking sheets for 2 minutes; remove to wire racks to cool completely.
COMBINE flour, cocoa, baking soda and salt in small bowl. Beat butter, granulated sugar, brown sugar and vanilla extract in large mixer bowl until creamy. Add eggs, one at a time, beating well after each addition. Gradually beat in flour mixture. Stir in morsels. Drop by well-rounded tablespoon onto ungreased baking sheets.
BAKE for 11 to 13 minutes or until cookies are puffed and centers are set. Cool on baking sheets for 2 minutes; remove to wire racks to cool completely.
We used Hersheys Chipits Pure Semi Sweet Mint Baking Chips. Unfortunately I was running low on cocoa (I only had a 1/3C) so I used a 1oz bar of semi sweet chocolate melted down, and added this with the wet ingredients. I reduced the butter by 1tbsp to compensate for the bar I added. This worked out great. The cookies were moist, and chocolatey :)
Given it's February, and some cookies should be made to celebrate Valentine's, there will probably be a second Cookie of the Month in a couple of weeks :)
If you make these, would love to hear what you think!
Tuesday, January 7, 2014
Cookie of the Month - Ninjabread Men!
My SIL told me about a 'Cake of the Month' idea she has been doing with a friend of hers. I loved it, and decided for 2014 that I would do a cookie of the month. It's hard enough for my family to finish a batch of cookies, so there is no way I could have us eating cake every month ;) (Here's my trick. I usually make the whole batch of cookie dough, then freeze half. That way when the kids want cookies I can easily bring some dough out to thaw and pop them in the oven. If you freeze them rolled into balls it makes the thawing and baking even easier! No more stale cookies) :)
January's cookie is inspired by a gift my son was given for his birthday. A LOVES to bake, and a friend of ours gifted him some Ninjabread cookie cutters. Aren't those fantastic? A asked me on Sunday if we could make them and I had him wait until yesterday as I figured it was a great birthday activity to do :)
11 years ago (wow!) when my hubby and I were married, my SIL gifted me the Betty Crocker Wedding Cookbook. It is my go to recipe book for almost everything. The recipes always turn out great. So when it came to looking for a gingerbread recipe for our Ninjas, it was this book that I turned to.
The only downside about this recipe is that it would yield ALOT of gingerbread. As I was running short on molasses, I split the recipe into thirds which ended up being a perfect amount, giving us two dozen Ninjas.
Gingerbread Cookies
1C packed brown sugar
1/3C shortening
1 1/2C dark molasses
2/3C cold water
7C all purpose flour
2tsp baking soda
2tsp ginger
1tsp ground allspice
1tsp ground cinnamon
1tsp ground cloves
1/2tsp salt
1. Beat brown sugar, shortening, molasses and water in bowl with mixer on medium speed. Stir in the rest of the ingredients. Cover and refrigerate for about 2 hrs.
2. Heat oven to 350.
3. Roll dough 1/4" thick on floured surface. Cut with cookie cutters (or Ninjas!)
4. Bake 10-12 minutes or until no indentation remains when touched. Cook on cookie rack.
The recipe above is the original amount so my guess is it would easily yield 60 cookies, or a gingerbread house :)
January's cookie is inspired by a gift my son was given for his birthday. A LOVES to bake, and a friend of ours gifted him some Ninjabread cookie cutters. Aren't those fantastic? A asked me on Sunday if we could make them and I had him wait until yesterday as I figured it was a great birthday activity to do :)
11 years ago (wow!) when my hubby and I were married, my SIL gifted me the Betty Crocker Wedding Cookbook. It is my go to recipe book for almost everything. The recipes always turn out great. So when it came to looking for a gingerbread recipe for our Ninjas, it was this book that I turned to.
The only downside about this recipe is that it would yield ALOT of gingerbread. As I was running short on molasses, I split the recipe into thirds which ended up being a perfect amount, giving us two dozen Ninjas.
Gingerbread Cookies
1C packed brown sugar
1/3C shortening
1 1/2C dark molasses
2/3C cold water
7C all purpose flour
2tsp baking soda
2tsp ginger
1tsp ground allspice
1tsp ground cinnamon
1tsp ground cloves
1/2tsp salt
1. Beat brown sugar, shortening, molasses and water in bowl with mixer on medium speed. Stir in the rest of the ingredients. Cover and refrigerate for about 2 hrs.
2. Heat oven to 350.
3. Roll dough 1/4" thick on floured surface. Cut with cookie cutters (or Ninjas!)
4. Bake 10-12 minutes or until no indentation remains when touched. Cook on cookie rack.
The recipe above is the original amount so my guess is it would easily yield 60 cookies, or a gingerbread house :)
Subscribe to:
Posts (Atom)